The DIY we're sharing with you today will probably only make sense if you're a Doctor Who fan or if you know someone who is. If you're not familiar with Doctor Who, it's easiest just to say that it's a sci-fi show on BBC. Actually describing the show would be almost impossible.
Although our love of the show isn't as full-fledged as some (we're still behind on the season and have yet to see the 50th anniversary special), we catch it whenever we can.
This DIY sweatshirt is great as a subtle, fun piece for Doctor Who fans. It's a cute sweatshirt that's easy to make and involves little time. This DIY is almost too simple to need instructions.
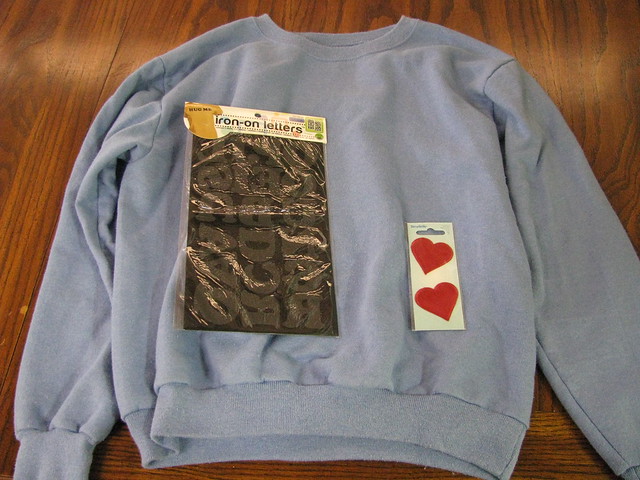
For this DIY, you'll need:
- a sweatshirt (we used a Hanes sweatshirt)
- iron-on letters
- two heart patches
Step One: Following the instructions on the iron-on letters, remove your letters from the package and arrange on the sweatshirt. Make sure to leave space for the two hearts. Once you are satisfied with the placement, follow the instructions with your iron-on letters to adhere them to the sweatshirt.
Step Two: Decide how you would like to attach the two hearts to the sweatshirt. You'll either want to sew the hearts on or iron them on depending on what type of patch you are using.
Step Three: Enjoy your sweatshirt while catching up on the 50th Anniversary episode.
This sweatshirt would also make a great gift for someone who likes Doctor Who.
Friday, January 24, 2014
DIY Doctor Who Sweatshirt
Monday, December 30, 2013
5 Tips for More Restful Sleep
This time of year, we all make resolutions for the New Year. One of the most popular good habits to form is getting enough sleep. As a college student and new middle school teacher, Elizabeth and I have picked up a few tricks for making falling asleep easier. We hope these tips will help you keep your New Year's Resolution of getting more sleep!
One
of my favorite bedtime rituals is drinking Sleepy Time Tea before bed.
It has calming chamomile and mildly sedative tilia flowers. My favorite
is the vanilla version. It smells like a cupcake!
There’s
nothing better than a hot bath before bed. Adding lavender scented
epsom salt to this bath will not only calm you with the soothing smell
but possibly help with any aches or pains you may have. You can buy an
expensive version of epsom salts, but inexpensive versions work just as
well. Just look for the ingredient magnesium sulfate.
A
relaxing scent is another way to create a sleep inducing atmosphere.
I’ve become addicted to Yankee Candle’s Tarts wax melts. They’re little
disks of wax that you put into the bowl of your wax warmer. They’re like
candles but without the flame or commitment. I love candles, but I like
the ease of changing scents without paying a lot of money for a new
candle. For bedtime I would suggest scents like Lavender Vanilla or Cozy
Sweater.
4. Sleep Mask
Once
you’re actually in bed using a sleeping mask is an effective way to
block out any light that may keep you from falling asleep or disrupt
your sleep cycle. If you’ve never used a sleep mask before you’ll be
surprised in the difference in the quality of your sleep. Plus who
doesn’t want to pretend that they’re Holly Golightly in Breakfast at
Tiffany’s.
5. Ear Plugs
Ear
plugs can also improve the quality of your sleep. At first they may
feel a little funny, but once you get used to wearing them they are
wonderful. If you live in a noisy area or if everyone in your house
doesn’t go to bed when you do, ear plugs will help you fall asleep more
easily. I find that ear plugs do not block all the sound, so sometimes I
like to wear earplugs and use a sound app that plays soothing sounds
like rain. There is a free app called Relax and Sleep that will play your desired sound on a timer.
Wednesday, September 4, 2013
No Scrub Bathtub Cleaning
Graphic courtesy of polyvore.com
I came across this time saving trick when I bought the book All-New Hints from Heloise Updated at a library book sale. While it's not the 90's anymore, Heloise's hints are still very effective and simple, so if you come across a cheap copy, I'd highly recommend it. Here's what you'll need for her easy tub cleaner.
1/4 cup baking soda
1/2 cup vinegar
1 cup clear ammonia
1 gallon warm water
a sponge mop
Simply mix the ingredients in a bucket. Dip your sponge mop in into the mixture and run it over the tub. Then, when you're done, rinse the tub with water. You should find that whatever residue is on your tub just runs off without scrubbing. You might also want to make sure that you leave the bathroom door open for ventilation. When I've used it, the smell has not been overpowering like with other cleaners, but it's always good to be on the safe side. Do you have any bathroom cleaning tips and tricks? Let us know!
Thursday, January 31, 2013
DIY Glitter Coasters
When I made the DIY Postcard Coasters, I also made two gold glitter coasters with the two extra coaster I had left. I've got both the glitter and postcard ones on my coffee table, and I like the way they look together.
The process for making the Glitter Coasters is fairly simple.

For supplies you'll need: Modpodge, glitter, old coasters, and a paintbrush.

Step One: Apply a coat of modpodge directly to the top of the coaster.

Step Two: Cover the modpodge with glitter. You'll want to have paper underneath to catch the excess glitter. I'd also advise using another sheet of paper on top to press down the glitter. Wait for the modpodge to dry. Then, shake off the excess glitter.

Step Three: Cover the glitter with a second layer of modpodge. Don't worry, it will dry clear. If there are any bare spots, you'll want to repeat the process in those areas. Otherwise, you're finished once the modpodge dries.

Now you can enjoy your new sparkly coaster.
Friday, November 16, 2012
Guest Post: Souvenir Coaster DIY

Update Sweet Pea Sylvie no longer exists so I've reposted the Souvenir Coaster DIY for all of you who'd like the directions.
Wednesday, October 17, 2012
Keeping up with Life of Lovely
Hi everyone!
Thanks for reading our blog.
We'd just like to remind you about different ways you can keep up with us.
Thanks for reading our blog.
We'd just like to remind you about different ways you can keep up with us.
- If you use bloglovin, you should definitely follow us there
- You can follow us on twitter and tweet us too @LifeofLovely
- Love pinterest? So do we! Share your favorite pins with us.
Have a lovely day!
Thursday, October 4, 2012
Two Minute Make-up Routine
Getting ready in the morning after spending the night with a
few friends, I suddenly realized that I’m the only one of us who wears make-up
every day. As we talked while I carefully applied mascara in the bathroom mirror, my friends discussed how
they usually felt too rushed in the morning to bother with make-up.
It seems like many women feel the same way, but putting on
make-up in the morning doesn’t have to be a production. For an everyday look, a simple make-up
routine that enhances rather than hides or changes your features is easy to
follow. At most my basic routine takes 2
minutes leaving plenty of time for your beauty sleep.
Step One: Sunscreen
Even if you decide to wear no make-up at all, sunscreen is
essential. Protecting your skin will
keep it healthy in the long run.
Step Two: Foundation
Don’t feel that your foundation has to cover every inch of
your face. As long as the shade matches
your skin, you only need to cover up areas that are red or uneven.
Step Three: Mascara
Using small strokes, coat only your top lashes with
mascara. For everyday make-up, mascara
on the bottom lashes really isn't necessary.
Take your time since rushing this step usually causes mistakes.
Step Four: Lipstick
For the finishing touch, lipstick, you can use a color close
to your natural color. However, swiping
a bright color just in the center, the using your finger to spread it like a
lip balm creates a more natural looking color.
With only four steps and four products, you have an almost
effortless, basic routine that you have time for each morning.
The products that I currently use are Aveeno Sunblock Face SPF-70, Clinique Acne Solutions Liquid Makeup, Maybelline Volum' Express Mascara,
Lancome L'Absolu Rouge Lipcolor .
What does your make-up routine look like?

Subscribe to:
Posts (Atom)